By taking your time and learning how to etch stainless Damascus and carbon Damascus steel properly, you’ll avoid problems like spots in your finished product. Damascus etching is done with a mixture of Ferric Chloride and Distilled Water, we use a 50/50 mixture. Before you begin, check the expiration date on your acid of choice to be sure that it’s not too old. Using expired acid causes problems with your etch, and you don’t want to find out after you’ve already started that your acid is too old to work properly. (Click here to buy the Ferric Chloride we use)
Step 1: Sanding
Bring your Damascus to a 400 to 600 grit finish. *Do not buff before etching! Buffing closes the pores in the metal, which will keep the acid from absorbing, and you’ll end up with an uneven etch.
Step 2: Washing
To etch Damascus, it should be perfectly clean. Thoroughly wash your piece with acetone and pat it dry with a clean rag.
Step 3: Dilution
If you’re using ferric acid, dilute it with DISTILLED water until you have pretty close to a 50/50 ratio of acid to water. Never use tap water, spring water, or filtered water – they will all cause problems with the etc. Be sure that your distilled water hasn’t been sitting for more than a year.
Step 4: Warming the acid
Warm if needed. The temperature of your acid should be between 70 and 120 degrees Fahrenheit, about room temperature.
If you need to warm your acid for use, the best method is to place your container of acid into a large bowl of warm water. Never put acid in the microwave!
Step 5: Submersion
With a wire, hang your damascus piece in the container of acid so that it hangs freely and doesn’t touch the bottom of the container.
To ensure that the acid penetrates, you can swish the piece back and forth in the acid, but brushing is the best way to be sure you get an even etch. Use a soft toothbrush and after 1 minute pull the Damascus from the etchant and lightly brush over the entire surface. Repeat this again at the 5 minute mark.
Let your piece remain in the acid for 10 minutes total or until you achieve the depth you want.
If there are sections that you don’t want the acid to etch then you can use nail polish to mask the material. Be careful to not brush the masked area when etching cause it can remove the polish.
Step 6: Neutralization
Remove your Damascus piece from the acid and dip it into a bath of baking soda for 10 minutes. Mix a generous amount of baking soda with distilled water to make your bath. Baking soda will settle to the bottom so make sure to mix it up well right before you drop your pieces in.
You can also use Windex for this step, but don’t try to spray your piece. Pour the windex into a container deep enough that you can completely submerge your Damascus item.
After 5 minutes, rinse the material thoroughly and then spray with Windex. It’s the ammonia in the windex that will ensure you have fully neutralized the Ferric Chloride. Pat dry with a clean rag.
If you have masked part of your piece so that it doesn’t etch, and you want to do another round in the acid and baking soda, completely remove the mask, clean the blade, and then reapply your mask before the second etch. Skipping this step is not advisable, even if your masking still looks good, because the acid can penetrate the second time around and ruin your design.
Step 7: Polishing with Sand Paper (Optional)
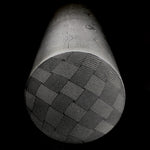
This works best with flat parts that are deep etched. One of the steels within the damascus isn’t affected by the etch, which is what gives stainless Damascus that unique texture when it’s finished. Use a 2000 grit sandpaper to gently buff the top of that slightly raised steel, and the other steel will remain dark and unpolished, giving you a beautiful and dramatic contrast. This can be tricky if the piece you are trying to sand isn’t flat, sometimes it’s just best to leave it as it is.
Some makers like to soak finished pieces in WD-40 over night to get a darker contrast. Results seem to vary with this but it won’t affect your material negatively if you want to try.
Click Here to Download "Etching Stainless & Carbon Damascus Guide".